Quick Start Guide
Overview
This section is intended for those users who are using InstallForge for the first time and want to familiarize themselves with the basic functions within a brief period of time. It is assumed here that InstallForge has already been successfully installed on the build system.
In the subsequent sections, you will become familiar with these subjects:
- Basic handling of the IBE
- Building a setup package with basic capabilities for a fictitious software application
Scenario
Within the scope of this page, the following fictitious scenario is assumed:
Your company myCompany has developed a monolingual (English) client-desktop application, named myApp, specifically
for Windows 10, and now you want to bundle version 1.0.0 it into a self-contained, standalone setup package using
InstallForge. During runtime, your application depends on the Microsoft Visual C++ Redistributable. Your goal is to
distribute this setup package to your end-users, enabling them to conveniently install and use your application on
their system.
Note
According to this scenario, the target system1 is Windows 10.
You have the following functional requirements for the setup package:
- The setup package checks if the operating system of the target system is Windows 10. If not, the installation will not be performed.
- The user interface of the setup package is in English.
- The program files of your application shall be installed in a path specified by the end-user. A default path shall be predefined.
- During installation, the end user shall be presented the license of your application. The user shall only be able to proceed with the installation if he accepts the license via the user interface.
- The Microsoft Visual C++ Redistributable package shall be installed automatically during the setup.
- The user shall be able to uninstall the installed application in a comfortable way.
- Shortcuts of the application executable shall be created on the desktop and the start menu of the specific user performing the installation. In addition, a shortcut shall be created in the start menu to easily uninstall the application.
Overview of the Program Files for myApp
The assumption here is that myApp has already been built (i.e., the executable has been compiled) and all the required program files are located in an arbitrary folder on the build system2. The content of this folder is supposed to look like this:
+--- assets
|   +--- someAsset.dat
|   +--- VC_redist.x86.exe
+--- docs
|   +--- myAppDoc.html
+--- lib
|   +--- someLib.dat
+--- license.txt
+--- myApp.exe
As you can see, the executable myApp.exe of myApp is located at the top level of the folder. The pre-built setup
package of the Microsoft Visual C++ Redistributable (obtained from the Microsoft website) is located in the assets
folder.
Overview of the IBE Interface
Now that all functional requirements for the setup package to be created have been defined based on the fictional scenario and all program files are prepared, the IBE of InstallForge can be launched.
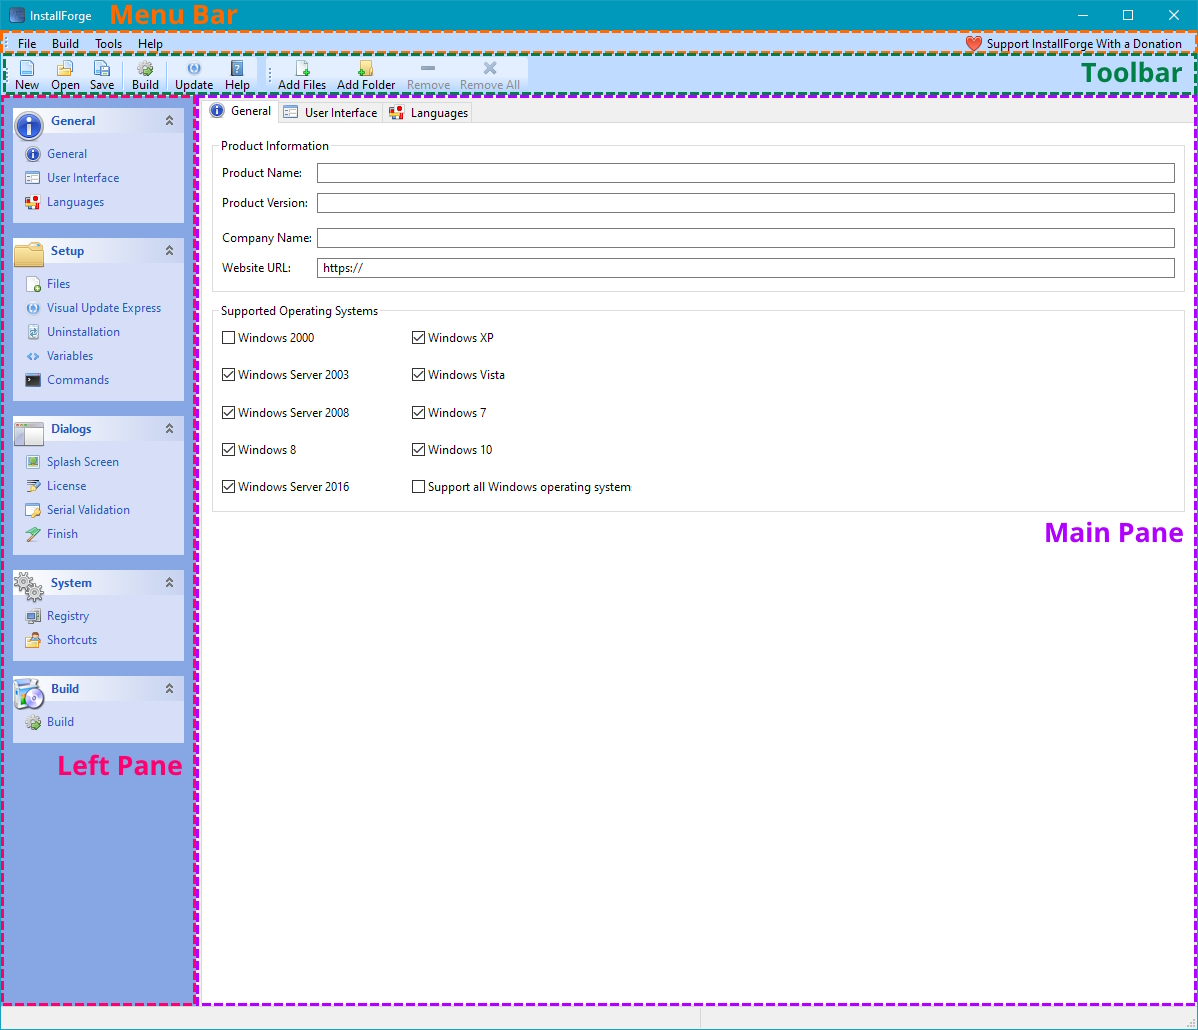
After launching the IBE, a GUI (graphical user interface) should appear, which can be simplistically divided into 4 main areas according to the table below. These areas are also depicted in the picture below.
| Area | Description |
|---|---|
| Menu Bar3 | Provides access to fundamental functionalities, such as creating a new InstallForge project file, opening/saving an InstallForge project file and building a setup package. |
| Toolbar4 | Provides access to some fundamental functionalities from the menu bar and also enables the user to add/remove files/folders to the setup package. |
| Left Pane | Lists functional categories, which in turn are divided into sections that allow related configurations of the setup package to be created. |
| Main Pane | The Main Pane is where the configurations of the setup package to be created are carried out. The configuration options displayed in the Main Pane depend on the selected section in the Left Pane. |
Configuration of the Setup Package
In this section, the configuration of the setup package is demonstrated on the basis of the functional requirements defined above.
General Information
In the first step we will configure the general information for our setup package. Follow the steps below for this purpose:
- Click
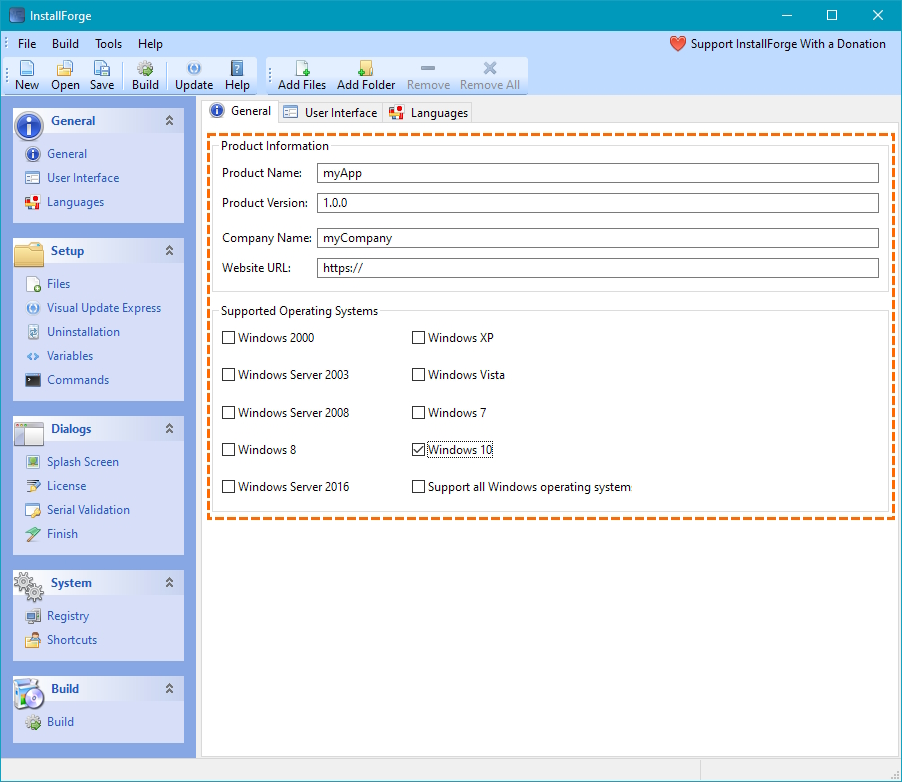
Generalin theGeneralcategory listed in the left pane. - In the main pane, enter the following information:
myAppin theProduct Nameinput field.1.0.0in theProduct Versioninput field.myCompanyin theCompany Nameinput field.
- In the
Supported Operating Systemsgroup, make sure that onlyWindows 10is checked.
This is how the result should look like in the IBE GUI:
Language
As according to our requirements the setup package should be built in English only, no further configuration is required at this point since InstallForge builds setup packages in English by default.
Program Files
In the next step we will add our program files to the setup package:
- Open the
Filessection in the categorySetupfrom the left pane. - Simply drag and drop the program files and folders of myApp on the file/folder list, as depicted in the animation below. InstallForge will recursively add all folders and their sub-folders to the setup package.
Note
Instead of using the drag & drop functionality, you may also add the program files/folders through the main toolbar.
Now that we have added our program files/folders, we will configure the installation path on the target system:
-
In the
Default Installation Pathgroup, provide this installation path: -
Make sure that
Allow user to change installation pathis checked.
Note
The provided (default) installation path <ProgramFiles>\<Company>\<AppName>\ will be resolved dynamically
during the runtime of the setup package. <ProgramFiles> is a path constant which usually will be resolved to
C:\Program Files (x86) on a 64-bit Windows target system. <Company> and <AppName> are setup constants
and will be resolved to myCompany and myApp in this particular case. For a full list of supported path
and setup constants, refer to this page.
Uninstaller
In order to allow your end-users to conveniently uninstall your application, follow these steps:
- Open the
Uninstallationsection in the categorySetupfrom the left pane. - Make sure that
Include Uninstalleris checked. - Make sure that the name of the uninstaller executable file is
Uninstall(this name should be configured by default).
Note
With this configuration, InstallForge will add another artifact to the setup package during build, namely an executable file representing the uninstaller. This executable file will be installed in the installation path together with the program files of your application.
Tip
If the final size of the setup package is of particular importance to you: the uninstaller executable file has just a size of approx. 840 KB!
Launching the Microsoft Visual C++ Redistributable Setup Automatically
According to the functional requirements, our application myApp needs the Microsoft Visual C++ Redistributable package during runtime. Obviously, one possibility would be to leave it up to the end-user to install the package himself. However, it is preferable to relieve the end-user from this additional effort and let our setup package install it automatically.
In the section Program Files, we already added the setup file of the Microsoft Visual C++ Redistributable package to our setup creator. When the end-user runs our setup package, this setup file will be extracted to the specified installation path.
In the next step, we now need to configure our setup package to run this setup during the installation of our application. To do this, we make use of the Commands functionality of InstallForge as follows:
- Open the
Commandssection in the categorySetupfrom the left pane. - Click the
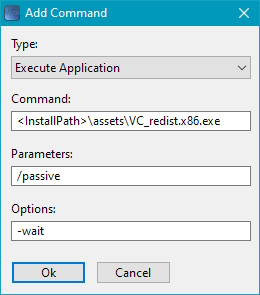
Add...button on the main pane. As a result, a dialog windows titlesAdd Commandwill appear. -
On the dialog window, provide these information (see also the picture below):
-
In the
Command:input field, enter: -
In the
Parameters:input field, enter: -
In the
Options:input field, enter:
-
Note
<InstallPath>is a path constant that will be resolved during the runtime of our setup package to the installation path specified by the end-user (e.g.C:\Program Files (x86)\myCompany\myApp).- The setup file
VC_redist.x86.exewill be launched after all of our program files have been extracted. It will be launched with the command-line parameter/argument/passive, which is specific to MSI, a technology used by Microsoft to create setup files for their redistributable packages. This parameter will ensure that the redistributable package setup is executed immediately without any user interaction with the GUI. - The option
-waitis specific to InstallForge setup packages and will make our setup to wait until the execution of the redistributable package setup is finished.
After the Microsoft Visual C++ Redistributable package is installed, the setup file located in the installation path should be deleted so as not to occupy unnecessary hard disk space on the end-user's system. For this purpose we will create another command as follows:
- Click again the
Add...button on the main pane. -
On the opened dialog window, provide these information:
-
Select
Shell Executeas the command type. -
In the
Command:input field, enter:
-
Note
The two commands we have specified so far will be executed in the order they were created.
Providing a License Text
To display your individual license text to the end-users during the installation of your application, asking them to agree to the license terms, follow the steps below:
- Click
Licensein theDialogscategory listed in the left pane. - On the main pane, make sure that
Show License Agreement Dialogis checked. - In the editor field, enter your individual license text. Additionally, format the text using the local toolbar buttons on the main pane.
Launching the Application after Finishing Installation
To allow the end-users to launch your application (myApp.exe) directly from the setup wizard once the installation
is finished, follow these steps:
- Click
Finishin theDialogscategory listed in the left pane. - On the main pane, make sure that
Run Applicationis checked. - In the input field next to the
Run Applicationcheckbox, enter the following path: - Additionally, specify the command-line parameters which
myApp.exeshall be executed with in theArgumentinput field.
Configuring Shortcuts
According to the functional requirements of our setup package, we want shortcuts to be created during installation. To do this, follow these steps
- Click
Shortcutsin theSystemcategory listed in the left pane. - On the main pane, make sure that
Create start menu shortcuts for all usersandCreate desktop shortcuts for all usersis unchecked. -
Click the
Add...button on the main pane and provide the following information in theAdd Shortcutdialog window:- Specify
Desktopas the destination. -
In the
Shortcut Nameinput field, enter: -
In the
Target Fileinput field, enter -
Click the
Okbutton.
- Specify
-
Repeat the previous step, but select
Startmenuas the destination. -
Repeat step 3 again, but provide these information:
- Specify
Startmenuas the destination. -
In the
Shortcut Nameinput field, enter: -
In the
Target Fileinput field, enter
- Specify
Building the Setup Package
Now that we have fully configured our setup package, we are going to build it in the final step:
- Click
Buildin theBuildcategory listed in the left pane. - On the main pane, provide a valid path for the setup file.
- In the main menu, click
Build→Build Setup. Alternatively, press F5.
Success
Provided your configuration does not contain any errors, the setup package should now be built successfully.